Pickleball Wall Practice: 5 Drills That Actually Work
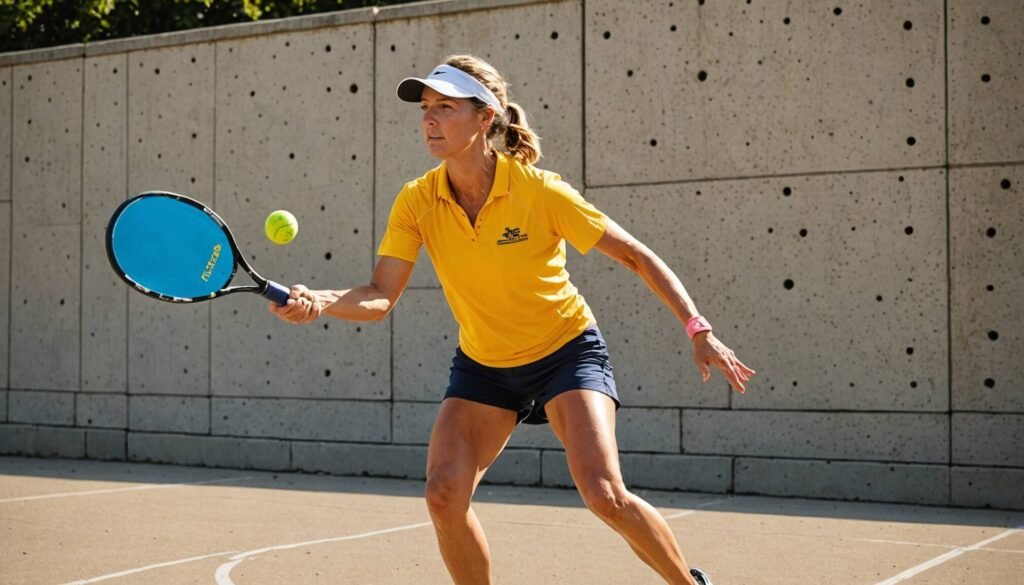
If you’ve been sleeping on pickleball wall practice, you’re leaving a serious training tool on the table. Most players write it off as something beginners do before they find a partner, but that’s a mistake. A well-structured wall session gives you more quality reps per hour than almost anything else you can do solo, and it’s available anytime, with no court booking required.
This article breaks down five specific drills, drawn from a session demonstrated by Ava Ignatowich on YouTube, that build real, transferable skills. We’re also going to explain everything in plain terms so that even if you’re newer to the game, you’ll know exactly what to do and why it matters.
Why the Wall Is One of Your Best Training Partners
Here’s the honest truth about wall practice: the wall doesn’t care how tired you are, doesn’t need to warm up, and never mishits. It returns every single ball you send at it. That consistency is something no human partner can match over a long session. Every shot comes back to you and forces you to respond, reset your feet, and do it again. That’s the repetition loop that builds real muscle memory.
The issue is that most players don’t treat the wall as a structured training tool. They walk up, tap the ball a few times without any goal in mind, and call it a session. That’s not practice, that’s just killing time. The difference between a productive wall session and a wasted one is intention. You need to know what you’re working on, how long you’re spending on it, and what feedback you’re looking for from the ball.
When you bring that kind of focus to pickleball wall practice, you walk away with better hands, sharper mechanics, and a genuine feel for pace and spin that shows up immediately in real games. If you’re not sure which shots deserve the most attention right now, it helps to look at the essential pickleball shots to master before drilling anything else.
For the Newcomers: What Does Any of This Actually Mean?
If you’re newer to pickleball, some of this terminology might feel a little foreign, so let’s slow down and explain it simply. Pickleball is played on a court roughly the size of a badminton court, with a low net in the middle. Players use a solid paddle to hit a plastic wiffle-style ball back and forth. The area near the net is called the kitchen, and you’re not allowed to volley the ball while standing in it.
Most recreational players have access to courts at community centers, parks, or gyms, but court time fills up fast, especially as the sport keeps growing. Wall practice solves that problem. All you need is a solid flat wall, your paddle, and a ball. You hit the ball against the wall and it comes back to you, just like a rally, except you’re doing it alone and at your own pace.
The drills below range from very soft, controlled touch shots near the wall to harder, more powerful drives. Each one targets a specific part of your game. Done in order, they form a complete 15 to 20 minute session that covers everything from warm-up to finishing with pure ball control.
What to Start With: The Warm-Up That Actually Matters
The biggest mistake players make when they get to the wall is starting too hard, too fast. Before your hands are warm, before you’ve found your paddle feel for the day, launching into full-power drives is counterproductive. You’ll groove bad mechanics at speed, and that’s worse than not practicing at all.
Ava opens her wall sessions with what she calls baby shots, also known as mini dinks. These are very soft, compact strokes played at close range to the wall, maybe four to five feet away, where the margin for error is tiny and the feedback is instant. If your contact point is off, the ball goes somewhere unexpected right away. There’s no hiding sloppy mechanics when you’re this close.
This warm-up phase isn’t just about loosening up your shoulder. It’s a direct lesson in grip pressure, which is one of the most underappreciated variables in the sport. Starting slow lets you experiment with how loosely you can hold the paddle and still keep the ball under control. Most players hold the paddle far too tightly under pressure, which kills touch and feel. This phase trains you out of that habit before it gets reinforced during the harder drills.
Drill 1: Mini Dinks for Soft Hands
Stand about four to five feet from the wall. Hit soft, controlled shots at roughly the height where the net would be in a real game, which is around kitchen height. Keep your wrist quiet and let your shoulder do most of the movement. Your goal here is not to generate pace or win a point. The goal is to build a feel for how the ball sits on your paddle face and how little effort it actually takes to keep the ball in play.
Run this for two to three minutes before adding any pace. It primes your hands and your brain for everything that follows. Pay attention to whether the ball is returning to roughly the same spot every time. If it keeps jumping high or dying low, your contact point or paddle angle is inconsistent, and that’s exactly what you want to identify and correct before moving on.
For newcomers: a dink is essentially a soft, arcing shot designed to land in the kitchen on the other side of the net. It’s a finesse shot, not a power shot. Mini dinks at the wall teach you the same soft touch needed to execute these in a real rally.
Drill 2: Backhand Drives
After your hands are warm, it’s time to work on one of the most commonly broken-down shots in recreational pickleball: the backhand drive. Ava is openly honest about her own struggles with this shot, describing having the yips on it at times. That kind of candor is worth paying attention to. Even competitive players are actively working on specific weaknesses during solo sessions. There’s no shame in identifying a problem and drilling it repeatedly until it stops being a problem.
The wall is one of the best environments to repair a shaky backhand drive because the feedback is immediate and you get dozens of reps in just a few minutes. When you hit a drive that clips the top of where the net would be and comes back low, that’s a good drive. When it comes back chest high or flies off unpredictably, something broke down in your swing.
Two things to check immediately if your backhand drive is inconsistent. First, your contact point. Are you catching the ball behind your hip? You want to make contact out in front of your lead foot, not beside or behind your body. Second, your paddle angle at contact. A slightly closed face, meaning the top of the paddle is angled slightly forward, keeps the ball down. An open face pops it up and invites an attack from your opponent.
If your drives consistently sit up high after contact, that’s exactly the problem covered in detail when looking at why flat drives keep getting attacked in competitive play. The wall will show you the fix faster than any amount of reading about it.
Drill 3: Forehand Drives
After the backhand work, switch to forehand drives. Most players are more comfortable on their forehand side, and that comfort can actually hide problems. When a shot feels natural, you stop analyzing it. Bad habits slip in and get cemented over time.
The wall is brutally honest about pace and direction. If your forehand drive drifts wide or bounces back unpredictably, your follow-through is likely collapsing early. You’re probably cutting across your body after contact instead of staying long through the swing toward your intended target. Focus on keeping your swing path moving forward even after the ball leaves the paddle.
Footwork is also worth monitoring during this drill. It’s easy to plant your feet during wall work and just grind on mechanics, but that trains a stillness that won’t serve you in a real point. Between every rep, take a small reset step. Shuffle sideways, step back, come forward. Make your body earn the next shot the way it would have to in an actual rally. Forehand drive mechanics are much easier to ingrain when your body position is consistent on every swing, and that consistency starts with your feet.
Drill 4: Backhand Slice for Singles Play
This is where the wall session separates players who use it intelligently from those who just blast drives at a surface for twenty minutes. After the drive work, Ava transitions to a backhand slice, a shot she’s developing specifically for singles. A low, skidding slice that stays deep forces your opponent into an awkward position and buys you time to move into a better spot on the court.
The slice generates backspin rather than topspin, which means the ball stays low off the bounce instead of kicking up toward your opponent’s comfortable hitting zone. It changes pace, disrupts rhythm, and when it’s executed well, it’s genuinely difficult to attack. Interestingly, the slice largely disappeared from the professional game in 2025, which is exactly why it still works at the recreational level. Opponents aren’t conditioned to handle it well.
To practice this at the wall, set up at a comfortable distance and focus on a swing path that moves from low to high, but with an open paddle face that creates backspin rather than driving through the ball. The ball should come off the wall lower than your drives. If it’s bouncing back high, you’re either hitting with a flat face or swinging down too steeply, both of which kill the spin and take away the effectiveness of the shot.
Visualize a target zone near the baseline while you practice. The goal in a real singles rally is to land this shot deep, not short where your opponent can step in and punish it. Solo drills like this are what actually move the needle on your match results, especially when you combine them with a clear system for what to do once you get to the net.
Drill 5: Catch-and-Hit Ball Control
This is the most underused drill in wall practice and probably the one that will make the fastest visible difference in your game. The catch-and-hit drill works like this: you hit a soft shot at the wall, let it return, and instead of hitting it again immediately, you absorb it gently on the face of your paddle and then redirect it back. No bounce. Just contact, absorb, and send.
It sounds simple. It is not. The drill trains you to soften your hands at the moment of contact, which is the exact skill you need when resetting a hard shot, executing a drop into the kitchen from mid-court, or taking pace off a speed-up from an opponent at the net. If your hands are stiff or your grip is tight, the ball will pop off the paddle instead of sitting on it, and you’ll feel that immediately.
Think of it as a reset simulation without a partner. The wall sends the ball with pace. Your job is to receive it quietly and redirect it with intention. This is directly connected to the mechanics behind resetting speed-ups, which is one of the hardest skills in pickleball to build without consistent live drilling. The wall gives you a reasonable approximation of the feeling you’re chasing.
Start close to the wall, around six feet. Focus on letting your elbow bend slightly as the ball arrives instead of blocking it rigidly. Aim for the same spot on the wall every time, because consistency is the entire point of this drill. If the ball is popping off unpredictably, you’re squeezing the paddle too hard. Run this for two to three minutes at the end of your session. It brings your hands back to a calm, controlled state after all the drive work and leaves you feeling sharp rather than fatigued.
How to Structure a Full Wall Session
Here’s a complete sequence you can run every time you find a wall with a few minutes to spare. The whole thing takes 15 to 20 minutes and hits every major skill category from touch to power to control.
Start with mini dinks for two to three minutes, close range, focused entirely on paddle feel and grip pressure. Then move to backhand drives for three to five minutes, concentrating on contact point and follow-through. Follow that with forehand drives for another three to five minutes, staying long through the swing and resetting your footwork between every rep. Then spend three to four minutes on the backhand slice, focusing on low contact, an open paddle face, and visualizing depth in your target zone. Finish with two to three minutes of catch-and-hit ball control, with soft hands and intentional redirects as the only goals.
That’s a complete session. You can repeat the sequence if you have more time, or extend individual drills based on what needs the most work that day. If your drilling sessions haven’t been producing results, lack of structure is almost always the reason. This sequence fixes that problem directly.
The One Mistake That Kills Most Wall Sessions
Players stop moving their feet. It happens almost every time. You get locked in on mechanics, trying to find the right contact point or the right paddle angle, and your feet just stop. You stand in one spot and grind reps from a stationary position. The problem is that shots built from a planted stance rarely hold up when you’re actually moving in a real point.
Court movement is a skill just like any other, and it needs to be trained alongside your shot mechanics, not separately from them. Between every single rep at the wall, take a small reset step. Shuffle to the side, step back, move forward, and then set up again for your next shot. Make your body earn every next hit the way it would have to in a real rally. This is the same principle behind positioning-first thinking in modern pickleball strategy: you get in position first, and then you execute the shot.
Is Wall Practice Actually Worth Your Time?
A focused 20-minute wall session beats an unfocused 90-minute recreational game when the goal is building specific skills. The wall gives you three things that recreational play can’t consistently offer: high repetition, honest feedback, and total availability. No partner needed, no court booking, no social pressure to look smooth while you’re actively working on your weakest shot.
With pickleball participation continuing to climb across the country according to the


